I don't remember the last time I posted a DIY craft here. Recently I was cleaning up one of my cupboards and found a whole stack of small black beauty boxes that I had been saving up. I was saving them up for creating a set of drawers to keep small knick knacks. Finally they saw the light of the day.
 |
| DIY Makeup Storage Box Tutorial Using Old Boxes |
The tutorial is something I had seen almost two years ago on the Sweet & Bitter Blog (yes I've been saving these boxes since a very long time!) My steps are slightly different but the basic idea is the same.
So lets quickly list down the things you will need:
1. 4 small boxes with lids
2. A pair of scissors
3. Glue (hot glue gun will do as well)
4. A whole puncher
 |
| DIY Makeup Storage Box Tutorial Using Old Boxes |
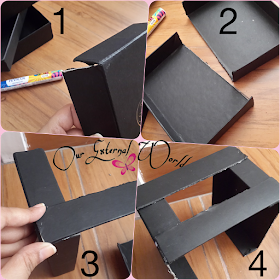
Now I will list the steps one by one and you can refer to the images that are numbered for the steps.
Let's begin on creating a set of storage drawers from old boxes.
1. Take the lid of two boxes and cut away one of the longer sides of the lids.
2. See images 1 and 2 for reference. Once done you should have two lids with one side missing on each. Make sure you do not break the sides you took off - we need these for the next step.3. Hold one lid vertically and glue one end of the strip you took off in step one to the smaller side of the lid as shown in image 3
4. Do the same for the other strip and now glue the other lid to these two strips - see image 4 for reference
 |
| DIY Makeup Storage Box Tutorial - Step 1 to 4 |
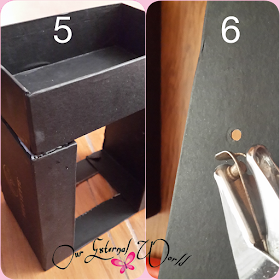
5. Now flip the structure you created in step 4 and glue one of the box on top (take the box whose lid you used in step 1). This is the basic structure with a fixed drawer on top.
6. Now take the paper punch and punch in holes in the 3 remaining boxes (you can discard the lids for now)
 |
| DIY Makeup Storage Box Tutorial - Step 5 & 6 |
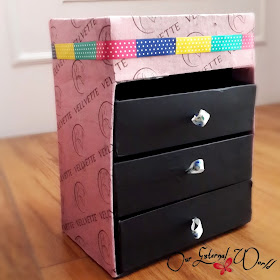
7. Thread small ribbons through these holes to create handles for the drawers. Make sure you glue the inner side of the ribbons so that they don't come out when you pull You can take a small ribbon, tie the two ends and create a knot. Then thread the ribbon from inside so that the knot side is in while the loop is pulled out. Now stick the knot inside either using hot glue or some tape. Stack your drawers inside the structure so that it looks something like image 7.
 |
| DIY Makeup Storage Box Tutorial - Step 7 |
8. Last step is to decorate your drawers. I simply used a pink sheet (this used to come inside the box as a wrapping of the products inside). Decorate with ribbon as you like.
 |
| DIY Makeup Storage Box Tutorial - Step 8 |
Once you are done you should have something like they image below. You can use your imagination to make it look as pretty as you want. I just wanted to get rid of the boxes but didn't have too much time so kept it very simple.
 |
| DIY Makeup Storage Box Tutorial Using Old Boxes |
You can use the same process to create a larger set of drawers if you use old shoe boxes. Do try it out and have fun with a little DIY this weekend!
Follow Me On instagram | facebook | pinterest

Great idea dear
ReplyDeletethank you Kajal :)
DeleteVery nice idea
ReplyDeleteDazzlingzest.blogspot.com
Follow each other
Xoxo
Very nice idea
ReplyDeleteDazzlingzest.blogspot.com
Follow each other
Xoxo
Thanks Manisha!
DeleteNow we see the quantity of those cautiously worded politically correct academy awards prevailing speeches written with the aid of pollsters and practiced in mirrors are doing.Custom Soap Boxes
ReplyDeleteReused/utilized boxes can likewise be utilized for putting away things in your home, carport or storage room. Mylabs
ReplyDeleteIt is very informative post thanks for sharing the information.
ReplyDeleteWhite Boxes
Pencil Boxes
Great article Lot's of information to Read...Great Man Keep Posting and update to People..Thanks tool bag singapore
ReplyDelete