You might have seen this DIY in a lot of places. I had seen it long back but never took the time to make it. But when I finally did, I enjoyed it so much that I had to share it here.
We are going to make a DIY nail polish remover jar. A lot of these are available over the counter from Bourjois, ColorBar, and Sephora. But its fun to do it yourself!
Things you will need:
Follow Me On instagram | facebook | pinterest
We are going to make a DIY nail polish remover jar. A lot of these are available over the counter from Bourjois, ColorBar, and Sephora. But its fun to do it yourself!
Things you will need:
1. An empty jar - plastic with a wide mouth screw cap
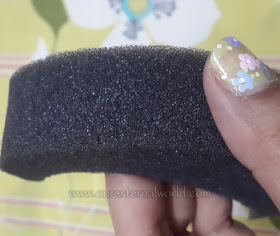
2. Sponge (take one which doesn't dissolve with acetone or your polish remover)
3. Any nail polish remover
 |
| D.I.Y. Nail Polish Remover Jar - Things Required |
To make sure your sponge will work, take a small piece and dip it in your polish remover. Then leave it for some time preferably in a closed container. Wet it a couple of times to make sure that you have tested it enough. The first time I made mine, the sponge actually started dissolving with the polish remover after a few hours and so I had to do it all over again!
 |
| D.I.Y. Nail Polish Remover Jar |
The process is extremely easy. Take a sponge piece that is the same height as your jar. I used an old face scrub jar. The sponge was also a leftover from some packaging that I had opened.
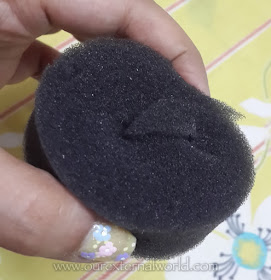
Now roll the sponge as shown in the picture below. You need the sponge to sit snuggly inside the jar and have a tight centre opening where you can place your finger. Tightly rolling a piece of sponge works well.
 |
| D.I.Y. Nail Polish Remover Jar |
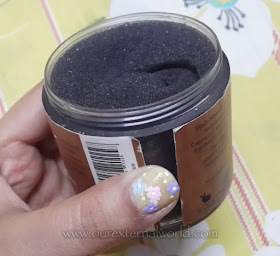
Now place this sponge inside the jar. You might need to adjust the sponge a couple of times until you get a snug fit. You don't want the sponge to be wiggling inside the jar or opening up inside.
 |
| D.I.Y. Nail Polish Remover Jar |
Once it fits nicely, pour your nail polish remover into the jar. Fill up half the jar and then close the lid tightly.
 |
| D.I.Y. Nail Polish Remover Jar |
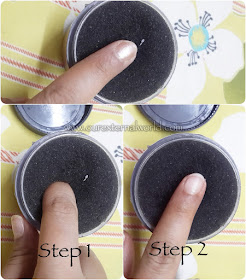
Now whenever you wish to remove your nail polish. All you need to do is place your finger in the centre of the jar and just turn it around. The sponge that is wet with the polish remover helps remove all the polish very easily.
 |
| D.I.Y. Nail Polish Remover Jar - How To Use |
For glitter polish you need to let your finger rest inside the jar a bit longer before you start to move it around.
This is a great way to not have to deal with cotton pads and a polish bottle separately. I find it very convenient to use and hope you will too!
I know my pictures came out weird this time, I had to take these indoors and at night and realised quite late that my backdrop did not help at all.
Hope you enjoyed this and would try it out.
Follow Me On instagram | facebook | pinterest

Genius! no more cotton balls! :)
ReplyDeleteenjoy!
DeleteI've made these before and they are awesome!
ReplyDeleteyay!
DeleteThis is great for people who don't want to mess with cotton pads or balls. Thanks for the tutorial!
ReplyDeleteI'm glad it was useful!
DeleteThis is a fabulous idea. I remember having a remover jar similar to this in high school, but haven't used one for a long time. I'll have to do this!! :)
ReplyDeleteI'm sure you'll have fun making it!
Deletethese have never worked for me! But I do love a good tutorial.
ReplyDeleteaww... try one that you make yourself, I'm sure it'll be better than the ready made ones
DeleteWorks wonderfully as long as you moisturize first. I found out if your dried out polish from the sponge will stain your fingers.
ReplyDeleteSo easy to make, easier to use, and cheaper than buying one ready made. THANK YOU SO MUCH FOR SHARING!
Now if you could come up with something this convenient for gel polish. haha
ha ha ha, I know gel polish removal can be a pain!
DeleteWorks wonderfully as long as you moisturize first. I found out if your dried out polish from the sponge will stain your fingers.
ReplyDeleteSo easy to make, easier to use, and cheaper than buying one ready made. THANK YOU SO MUCH FOR SHARING!
Now if you could come up with something this convenient for gel polish. haha
I used to make these a lot back when they were first really popular and found that it was so fun to create my own. This reminded me I should do it again :)
ReplyDeleteYup its the fun of doing it that matters :)
Deletemy goodness! this is just sheer brilliance!!
ReplyDeleteit is so much fun dear, do try it out!
DeleteWhat a great way to have this and save money!
ReplyDeleteits real fun!
DeleteThis is great - makes everything less messy. Thanks for this!
ReplyDeleteit sure does!
DeleteSuch a great diy and it seems like it would be great for removing glitters!
ReplyDeleteit is, all the glitter remains inside so there is no mess
DeleteGood work! Glad to hear this method works with glitter polish too!
ReplyDeleteyup it does!
DeleteI tried this with a regular kitchen sponge and it didn't work for me. Maybe I need a sponge similar to the one you used... :-)
ReplyDeleteSome sponges actually melt away due to the acetone content
DeleteI seriously need to make this!
ReplyDeletetry it Ann, its fun if nothing else!
DeleteThis looks so good will have to make one some day as I am always running out of cotton pads x
ReplyDeleteits great to have on the nail desk
DeleteThis is an great idea. Liked it. Thanks for sharing it.
ReplyDeletehttp://tipsoye.com/
This comment has been removed by a blog administrator.
ReplyDeleteشركة مكافحة النمل الابيض بالخبر
ReplyDelete